React Native (Expo) から Azure Functions と SignalR Service のクイック スタートのサンプルアプリを試してみた
クイック スタート:C# を使用した Azure Functions と SignalR Service によるチャット ルームの作成のクライアントテストアプリケーションを Expoで作成して試してみます。
記事の中で紹介されている サンプルのシングル ページ Web アプリケーション を React Native + Expo 用にちょっと書き直しです。
クリックスタートに従って、ブラウザで動くところまで準備して
- Azure SignalR Service作成
- サンプル アプリケーションの準備と実行
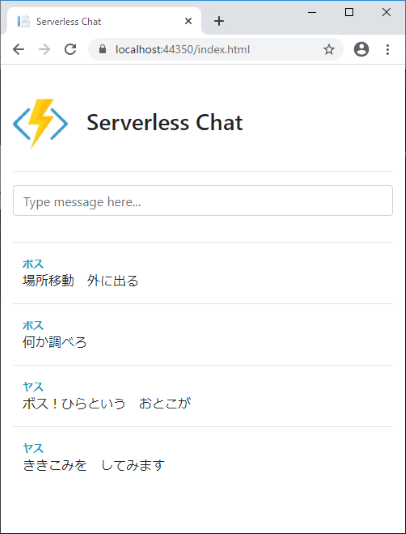
- Web アプリケーションで動作確認
クライアントを作成です。
Expo のプロジェクト作成 (TypeScript)とパッケージを必要なパッケージの追加
expo init chat
cd chat
npm i @microsoft/signalr
npm i axios
あとは出来たプロジェクトのApp.tsxをちょい修正してサンプルアプリは完了。
import React from 'react'
import { StyleSheet, Text, TextInput, Button, SafeAreaView, FlatList } from 'react-native'
import { HubConnectionBuilder } from '@microsoft/signalr'
import axios from 'axios'

const name = 'ヤス'
const apiBaseUrl = 'http://192.168.XXX.XXX:7071'

export default class App extends React.Component {
  state:IState = {
    isReady: false,
    count: 1,
    text: '',
    messages: []
  };

  increment (): number {
    const count = this.state.count + 1
    this.setState({ count: count })
    return count
  }

  componentDidMount = () => {
    const hubConnection = new HubConnectionBuilder()
      .withUrl(`${apiBaseUrl}/api`)
      .build()

    hubConnection.onclose(() => console.log('disconnected'))
    hubConnection
      .start()
      .then(() => this.setState({ isReady: true }))

    hubConnection.on('newMessage', (m:IMessage) => {
      const key = this.increment()
      const messages = this.state.messages.slice() as Message[]
      const message = new Message(key.toString(), m.sender, m.text)
      messages.unshift(message)
      this.setState({ messages: messages })
    })
  }

  sendMessage = (text:string) => {
    axios.post(`${apiBaseUrl}/api/messages`, {
      sender: name,
      text: text
    }).then(_ => {})
    this.setState({ text: '' })
  }

  render () {
    if (!this.state.isReady) {
      return <SafeAreaView style={styles.container}>
        <Text>Connecting</Text>
      </SafeAreaView>
    } else {
      return <SafeAreaView style={styles.container}>
        <Text>Serverless Chat</Text>
        <TextInput
          style={styles.textBox}
          onChangeText={value => this.setState({ text: value })}
          value={this.state.text}
        />
        <Button
          title="送信"
          onPress={() => {
            this.sendMessage(this.state.text)
          }}
        />
        <FlatList
          data={this.state.messages}
          renderItem={({ item }) =>
            <Text style={styles.item}>
              {item.sender} : {item.text}
            </Text>}
        />
      </SafeAreaView >
    }
  }
}

class Message implements IMessage {
  key: string
  sender: string
  text: string

  constructor (key: string, sender: string, text: string) {
    this.key = key
    this.sender = sender
    this.text = text
  }
}

interface IMessage {
  sender: string
  text: string
}

interface IState {
  isReady: boolean
  count: number
  text: string
  messages: Message[]
}

const styles = StyleSheet.create({
  container: {
    flex: 1
  },
  item: {
    padding: 10,
    height: 44
  },
  textBox: {
    height: 50,
    margin: 10,
    padding: 10,
    borderColor: 'gray',
    borderWidth: 1
  }
})
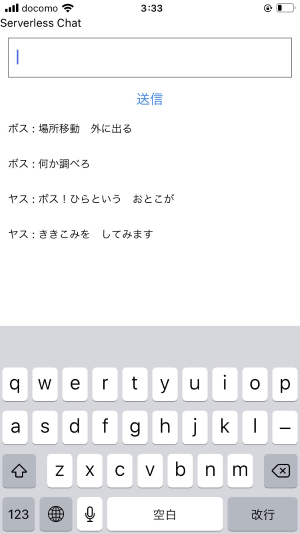
サンプルのシングル ページ Web アプリケーションと同じように動きました。


GraphQL for .NET で Azure Functions + Cosmos DB を試してみた
Azure Functions で .NET を使って GraphQL の QueryとMutation を試してみました。
以下のブログと紹介されているコードを読めば特に説明不要ですね。
追加するするパッケージも以下の3つだけ。
- GraphQL.Server.Core
- Microsoft.Azure.Functions.Extensions
- Microsoft.Azure.WebJobs.Extensions.CosmosDB
デモのInfrastructure内のコードやStartupなどは、ほぼそのまま。モデルやスキーマをちょっと変えて試してみました。
Model と Type
public class Person
{
    public string Id { get; set; }
    public string Firstname { get; set; }
    public int Age { get; set; }
}
public sealed class PersonType : ObjectGraphType<Person>
{
    public PersonType()
    {
        Name = "Person";

        Field(x => x.Id, type: typeof(IdGraphType)).Description("ID");
        Field(x => x.Firstname).Description("Firstname");
        Field(x => x.Age).Description("Age");
    }
}
Query
public class SampleQuery : ObjectGraphType
{
    private static readonly Uri CollectionUri = UriFactory.CreateDocumentCollectionUri("SampleDB", "People");

    public SampleQuery(IDocumentClient documentClient)
    {
        // 全件取得
        Field<ListGraphType<PersonType>>(
            "people",
            resolve: context => documentClient.CreateDocumentQuery<Person>(CollectionUri, null)
        );

        // IDを指定して取得
        FieldAsync<PersonType>(
            "person",
            arguments: new QueryArguments(
                new QueryArgument<IdGraphType> { Name = "id", Description = "ID" }),
            resolve: async context =>
            {
                var id = context.GetArgument<string>("id");
                var uri = UriFactory.CreateDocumentUri("SampleDB", "People", id);
                var document = await documentClient.ReadDocumentAsync<Person>(uri, new RequestOptions { PartitionKey = new PartitionKey(id) });

                return document.Document;
            });
    }
}
Mutation
public class SampleMutation : ObjectGraphType
{
    private static readonly Uri CollectionUri = UriFactory.CreateDocumentCollectionUri("SampleDB", "People");

    public SampleMutation(IDocumentClient documentClient)
    {
        // 追加
        FieldAsync<PersonType>(
            "createPerson",
            arguments: new QueryArguments(
                new QueryArgument<NonNullGraphType<StringGraphType>>
                {
                    Name = "firstname"
                },
                new QueryArgument<NonNullGraphType<IntGraphType>>
                {
                    Name = "age"
                }),
            resolve: async context =>
            {
                var firstname = context.GetArgument<string>("firstname");
                var age = context.GetArgument<int>("age");
                var id = Guid.NewGuid().ToString();
                var person = new Person
                {
                    Id = id,
                    Firstname = firstname,
                    Age = age
                };

                await documentClient.CreateDocumentAsync(CollectionUri, person);

                return person;
            }
        );

        // 更新
        FieldAsync<PersonType>(
            "updatePerson",
            arguments: new QueryArguments(
                new QueryArgument<NonNullGraphType<StringGraphType>> { Name = "id" },
                new QueryArgument<StringGraphType>
                {
                    Name = "firstname"
                },
                new QueryArgument<IntGraphType>
                {
                    Name = "age"
                }
                ),
            resolve: async context =>
            {
                var id = context.GetArgument<string>("id");
                var firstname = context.GetArgument<string>("firstname");
                var age = context.GetArgument<int>("age");

                var uri = UriFactory.CreateDocumentUri("SampleDB", "People", id);
                var person = new Person
                {
                    Id = id,
                    Firstname = firstname,
                    Age = age
                };
                await documentClient.ReplaceDocumentAsync(uri, person);
                return person;

            });

        // 削除
        FieldAsync<StringGraphType>(
            "deletePerson",
            arguments: new QueryArguments(
                new QueryArgument<NonNullGraphType<StringGraphType>>
                {
                    Name = "id"
                }
            ),
            resolve: async context =>
            {
                var id = context.GetArgument<string>("id");

                var uri = UriFactory.CreateDocumentUri("SampleDB", "People", id);
                await documentClient.DeleteDocumentAsync(uri, new RequestOptions { PartitionKey = new PartitionKey(id) });
                return id;
            });

    }
}
Schema
public class SampleSchema : GraphQL.Types.Schema
{
    public SampleSchema(IDependencyResolver dependencyResolver) : base(dependencyResolver)
    {
        Query = dependencyResolver.Resolve<SampleQuery>();
        Mutation = dependencyResolver.Resolve<SampleMutation>();
    }
}
クエリ
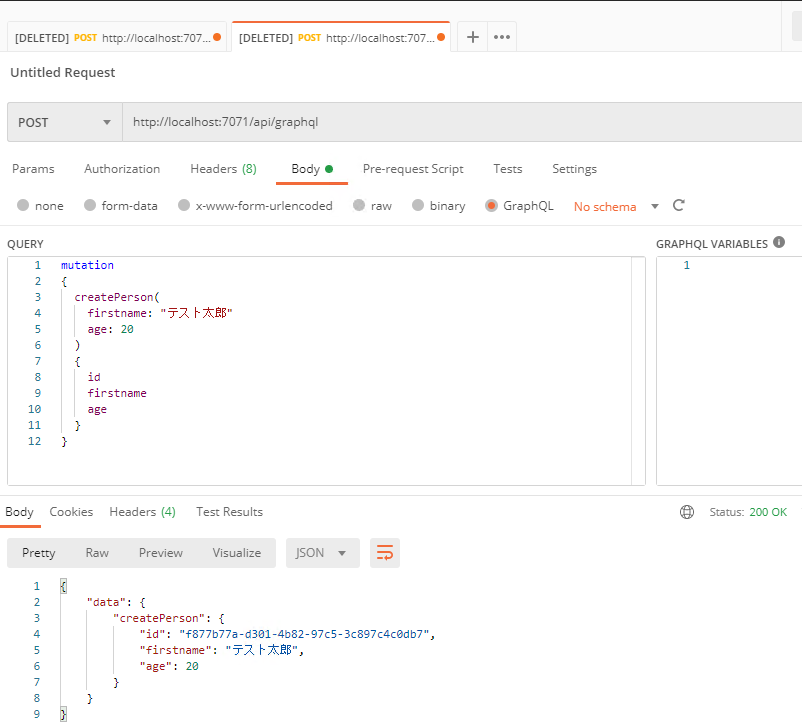
GraphiQL はないで、Postman で GraphiQL を指定して動作確認して無事完了。

クエリはこんな感じです。
取得
query {
    people {
        id
        firstname
        age
    }
}
query
{
  person (id : "00000000-0000-0000-bed0-3d36769a33c0")
  {
    id
    firstname
    age
  }
}
追加
mutation
{
  createPerson(
    firstname: "太郎"
    age: 10
  )
  {
    id
    firstname
    age
  }
}
更新
mutation
{
  updatePerson(
    id : "00000000-0000-0000-bed0-3d36769a33c0"
    firstname: "次郎"
    age: 20
  )
  {
    id
    firstname
    age
  }
}
削除
mutation
{
  deletePerson(
    id : "00000000-0000-0000-bed0-3d36769a33c0"
  )
}
Subscription
Subscription には対応していないので、通知は SignalR を使うのが簡単ですね。Cosmos DB の変更通知でしたら、以下で紹介されているシナリオと同じです。
ASP.NET Core ではないですが、Azure Functions と Azure SignalR Service は Microsoft Learn で試すことも可能です。
gRPC-Web for .NET のサービスを Azure App Service にデプロイしてブラウザからアクセスする
gRPC-Web for .NETが正式リリースされましたので、簡単なアプリを Azure App Service にデプロイしてWebブラウザからアクセスしてみます。
詳しい手順が書かれた公式ドキュメントが揃っていますのでメモ程度です。
環境 - Windows 10 / Visual Studio 2019
Server
チュートリアル: ASP.NET Core で gRPC のクライアントとサーバーを作成する とブラウザー アプリでの gRPC の使用を参考にgRPC・gRPC-webに対応したサーバーを作成します。
ざっくり以下な感じです。
- gRPC サービスのプロジェクトを作成
- Grpc.AspNetCore パッケージを 2.29 以降に更新し、Grpc.AspNetCore.Web パッケージを追加
- UseGrpcWeb と EnableGrpcWeb を Startup.cs に追加
- CORSの設定。CORSはローカルで開発する際に必要ですが、App Service では設定で対応できます。
    public class Startup
    {
        public Startup(IConfiguration configuration, IWebHostEnvironment env)
        {
            _configuration = configuration;
            _env = env;
        }

        private readonly IConfiguration _configuration;
        private readonly IWebHostEnvironment _env;

        public void ConfigureServices(IServiceCollection services)
        {
            services.AddGrpc();

            if (_env.IsDevelopment())
            {
                services.AddCors(o => o.AddPolicy("AllowAll", builder =>
                {
                    builder.AllowAnyOrigin()
                        .AllowAnyMethod()
                        .AllowAnyHeader()
                        .WithExposedHeaders("Grpc-Status", "Grpc-Message", "Grpc-Encoding", "Grpc-Accept-Encoding");
                }));
            }
        }

        public void Configure(IApplicationBuilder app, IWebHostEnvironment env)
        {
            app.UseRouting();

            app.UseGrpcWeb();

            if (env.IsDevelopment())
            {
                app.UseCors();
                app.UseEndpoints(endpoints =>
                {
                    endpoints.MapGrpcService<GreeterService>().EnableGrpcWeb().RequireCors("AllowAll");
                });
            }
            else
            {
                app.UseEndpoints(endpoints =>
                {
                    endpoints.MapGrpcService<GreeterService>().EnableGrpcWeb();
                });
            }
        }
    }
あとは 普通に App Service にデプロイすればサーバーの準備は完了です。App Serviceの構成にHTTPバージョンの設定がありますので2.0に変更も可能です。
Client
デプロイした gRPC-web にWebブラウザでアクセスするクライアントを作成します。
最初にprotobufスキーマからJavaScriptなどを生成する protoc と grpc-web を準備します。それぞれ実行可能なバイナリファイルを以下からダウンロード。適当にパスの通ったフォルダにコピーし、grpc-webは protoc-gen-grpc-web.exe に名前を変更します。
protoc
https://github.com/protocolbuffers/protobuf/releases
grpc-web
https://github.com/grpc/grpc-web/releases
今回は TypeScriptで書きたいのでimport_styleにcommonjs, typescriptを指定してコマンドを実行し、gRPCのJavaScript・型定義ファイル、grpc-web の TypeScriptのファイルを作成します。また、protoファイルは Server で使用した greet.proto をそのまま使っています。
コマンド例
protoc --proto_path= greet.proto --js_out=import_style=commonjs:./ --grpc-web_out=import_style=typescript,mode=grpcwebtext:./
生成されたファイル
- greet_pb.js
- greet_pb.d.ts
- GreetServiceClientPb.ts
Vue CLI などでクライアントプロジェクトを作成して、上記で作成したファイルを適当な場所にコピーすれば準備完了です。 以下のようにアクセスできます。
import Vue from "vue";
import { HelloRequest } from "../models/greet_pb";
import { GreeterClient } from "../models/GreetServiceClientPb";
export default Vue.extend({
  name: "Home",
  components: {
    HelloWorld
  },
  data() {
    return {
      msg: ""
    };
  },
  mounted: function() {
    const request = new HelloRequest();
    request.setName("匿名希望");

    const client = new GreeterClient(
      "https://xxxxx.azurewebsites.net",
      {},
      {}
    );
    client.sayHello(request, {}, (err, ret) => {
      if (err || ret === null) {
        console.log(err);
      } else {
        this.msg = ret.getMessage();
      }
    });
  }
});
参考
MSAL.js(v2) で取得したトークンを使用して JavaScript 用 Azure Blob Storage v12を使う
Azure Functions や Web Apps を使わず静的なサイトでBlobを扱いたかったので、前回試していたMSAL.js(v2)のトークンを使って試しにBlobのコンテナ一覧を取得してみます。
REST APIを直接呼ぶ場合は、acquireTokenSilent で取得した accessToken を Bearer に設定。x-ms-version や x-ms-client-request-id などを Headers に追加する程度ですね。
今回は、JavaScript 用 Azure Blob Storage v12を使ってみます。サンプルは前回と同じく TypeScript + Vue.jsです。 TokenCredential と getToken の戻りとなる AccessToken を作成して、BlobServiceClient に作成した TokenCredential を渡せばコードは完了です。 あとはSASでのアクセスと同じくCORSやIAMの設定も必要です。
サンプル
import {
  TokenCredential
} from "@azure/identity";
import * as Msal from "@azure/msal-browser";
import { AccessToken } from "@azure/core-auth";
class MsalAccessToken implements AccessToken {
  token = "";
  expiresOnTimestamp = 0;
}

class MsalTokenCredential implements TokenCredential {
  private _context: Msal.PublicClientApplication;
  constructor(PublicClientApplication: Msal.PublicClientApplication) {
    this._context = PublicClientApplication;
  }

  getToken(
    scopes: string | string[],
    options?: import("@azure/core-auth").GetTokenOptions | undefined
  ): Promise<AccessToken | null> {
    const silentRequest = {
      scopes: ["https://storage.azure.com/user_impersonation"]
    };
    const response = this._context.acquireTokenSilent(silentRequest);
    return response.then(res => {
      const ma = new MsalAccessToken();
      ma.token = res.accessToken;
      ma.expiresOnTimestamp = Date.now() + 60 * 60 * 1000;
      return ma;
    });
  }
}

import {
  BlobServiceClient
} from "@azure/storage-blob";
import {
  ref,
  defineComponent,
  onMounted
} from "@vue/composition-api";
export default defineComponent({
  props: {
    storageAccount: {
      type: String,
      default: ""
    }
  },
  setup(props, context) {
    const containers = ref<string[]>([]);
    onMounted(async () => {
        try {
          const tokenCredential = new MsalTokenCredential(context.root.$msal)
          const blobServiceClient = new BlobServiceClient(
            `https://${props.storageAccount}.blob.core.windows.net`,
            tokenCredential
          );
          const iter = blobServiceClient.listContainers();
          for await (const container of iter) {
            containers.value.push(container.name);
          }
        } catch (error) {
          console.log("failed: ", error);
        }
    });
    return {
      containers
    };
  }
});
MSAL.js(v2)をTypeScriptで試してみる
MASL.js(V2)を使用してみます。まだ動いたので Azure Management Service API使ってサブスクリプションの一覧を取得してみます。
Microsoft ID プラットフォームのコード サンプル (v2.0 エンドポイント) の 認証コード フローと PKCE を使用した Microsoft Graph の呼び出し を参考に、 Vue.js + TypeScript で少し書き直しています。
アプリケーションを登録する
クイック スタート:Microsoft ID プラットフォームにアプリケーションを登録する を参考にアプリを登録します。
Azure ポータル のアプリの登録から作成して以下を設定するだけです。概要のアプリケーション (クライアント)IDは後程使いますのでメモっておきます。
クイック スタート:Microsoft ID プラットフォームにアプリケーションを登録する https://docs.microsoft.com/ja-jp/azure/active-directory/develop/quickstart-register-app
アプリケーションの作成
今回作成したコード(typescript-vuejs-masl-v2-sample)。作成した環境は以下となっています。
- Node.js 12.18.0 LTS
- Vue CLI 4.4.1
もとのサンプルの authRedirect.js を handleRedirectCallbackをhandleRedirectPromiseに変更、scopesを変更。あとはTypeScript + Vue.js な感じに少し手直しして完了です。
API関連を抜粋
設定
const msalConfig = {
  auth: {
    clientId: "Application(Client)ID",
    authority: "https://login.microsoftonline.com/common",
    redirectUri: "http://localhost:8080/"
  },
  cache: {
    cacheLocation: "sessionStorage",
    storeAuthStateInCookie: false
  }
};
ログイン
      signIn() {
        const loginRequest = {
          scopes: ["https://management.core.windows.net//user_impersonation"]
        };
        context.root.$msal.loginRedirect(loginRequest);
      },
ログアウト
      signOut() {
        context.root.$msal.logout();
      }
サブスクリプション一覧取得
      const silentRequest = {
        scopes: ["https://management.core.windows.net//user_impersonation"]
      };
      try {
        const response = await context.root.$msal.acquireTokenSilent(
          silentRequest
        );
        const data = await callApi(
          "https://management.azure.com/subscriptions?api-version=2020-01-01",
          response.accessToken
        );
        data.value.forEach(function(value: any) {
          const id: string = value.subscriptionId;
          subscriptions.push(id);
        });
      } catch (error) {
        console.log("failed: ", error);
      }
Azure Storage での静的 Web サイト ホスティング
前回作ったD3.jsの世界地図をベースに簡単な地図の色塗りサイト作りましたので、Azure Storage + Azure CDN の静的 Web サイトでホスティングします。
もともとAzure Repos でソース管理していましたので、Azure Pipelines でビルドからデプロイの自動化までは作業は大まかに3つ。しばやんのブログの通り行うだけですので簡単です。
- Azure Storage 設定
- Azure Pipelines 設定
- Azure CDN 設定
今回、Vue.js, Vuetify, TypeScriptで作っていますので、Azure Pipelinesの設定はほぼ同じです。
https://github.com/shibayan/daruyanagi.com/blob/master/azure-pipelines.yml
Pipeline caching が GA したので Cache@2 を使って、切り戻し用のバックアップ処理を追加している程度の違いです。
azure-pipelines.ymlにバックアップを追加
- task: AzureCLI@1
  inputs:
    azureSubscription: 'Subscription1'
    scriptLocation: 'inlineScript'
    inlineScript: |
      end=`date -d "5 minutes" '+%Y-%m-%dT%H:%M:%SZ'`
      sas1=`az storage container generate-sas -n '$web' --account-name $1 --https-only --permissions dlr --expiry $end -otsv`
      sas2=`az storage container generate-sas -n 'archives' --account-name $1 --https-only --permissions dlrw --expiry $end -otsv`
      ./azcopy sync "https://$1.blob.core.windows.net/\$web?$sas1" "https://$1.blob.core.windows.net/archives/$(Build.BuildNumber)?$sas2" --recursive --delete-destination=true
    arguments: 'storage1'
  displayName: 'Archive to Storage'
バックアップは Azure Blob のライフサイクル管理)で7日で削除しています。
Azure Blob Storage のライフサイクルの設定
{
    "rules": [
        {
            "enabled": true,
            "name": "LifeCycle1",
            "type": "Lifecycle",
            "definition": {
                "actions": {
                    "baseBlob": {
                        "delete": {
                            "daysAfterModificationGreaterThan": 7
                        }
                    }
                },
                "filters": {
                    "blobTypes": [
                        "blockBlob"
                    ],
                    "prefixMatch": [
                        "archives"
                    ]
                }
            }
        }
    ]
}
Microsoft Learn にAzure CDN と Blob Service を使用して、Web サイト用のコンテンツ配信ネットワークを作成する がありますので、サンドボックスで試すことも出来ます。
そのほか、サーバーサイドが使えない静的サイト+SPAということなので、HTTPS へのリダイレクトを JavaScript で追記。
<script type="text/javascript">
if(location.protocol == 'http:') {
  location.replace(location.href.replace(/http:/, 'https:'));
}
</script>
しばやんから、Microsoft Standard やVerizon Premium なら、https へのリダイレクトは CDN でもできると教えていただきました。

SPA用にGoogle アナリティクスの設定
import VueAnalytics from 'vue-analytics'
Vue.use(VueAnalytics,
    {
        id: 'UA-XXXXX',
        router
    });
お問い合わせ用のGoogleフォームを追加して完了です。
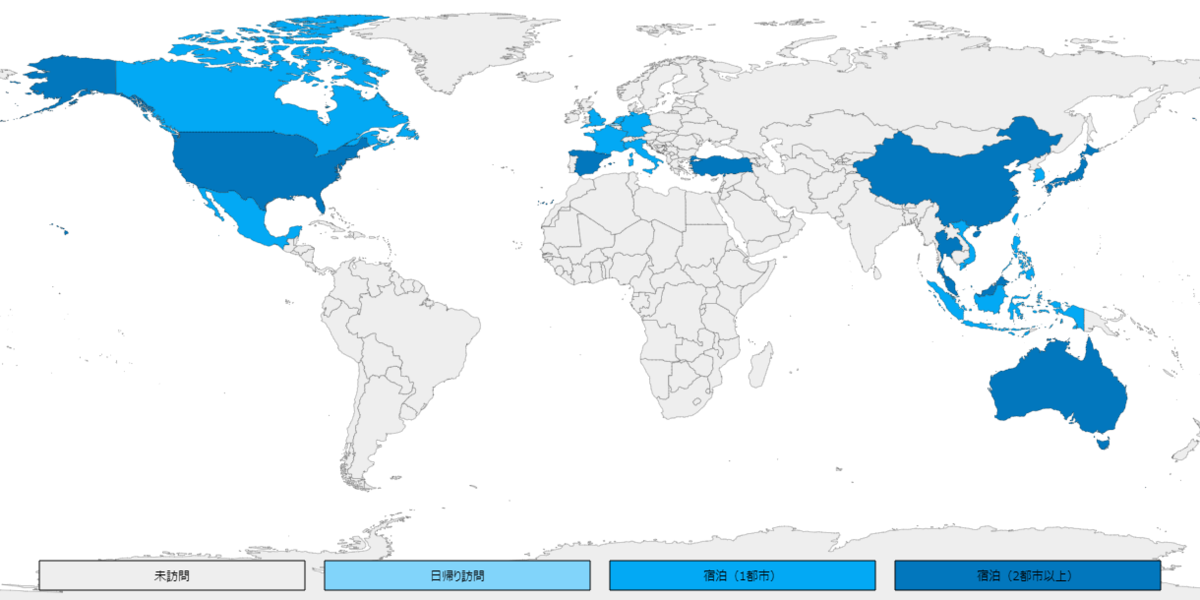
Azure関連のリソースなどは会社のものを使わせていただき公開(Blank Maps)。今まで自分が旅行したところなどを塗ってみました。

D3.jsで世界地図を表示
世界地図に行ったところの国でも色塗りしようと思いD3.jsで試してみました。
地図データの準備
NatualEarthからダウンロード
今回は、110m Cultural Vectors の Admin 0 – Details / map units を使用。 https://www.naturalearthdata.com/downloads/110m-cultural-vectors/
データの変換
ダウンロードしたshapefileをtopojsonに変換します
使用するパッケージのインストール
npm install -g topojson shapefile
変換(shapefile > geojson > topojson)
shp2json ne_110m_admin_0_map_units.shp | geo2topo -q 1e6 > countries.topojson
ちょい圧縮
toposimplify -P 0.5 -f countries.topojson > countries.min.topojson
不要言語などを削除する場合は、ndjson-cli をインストールして「ndjson-filter "delete d.properties.NAME_AR" 」などでフィルタ。
地図を表示
データが出来たので、あとはD3.jsを使って表示すれば完了です。今回はTypeScript (+Vue.js)で地図を表示。
index.vue
<template>
    <div id="inspire">
        <svg id="svg"
             :width="width"
             :height="height"
             :viewBox="viewBox">
        </svg>
    </div>
</template>

<script src="./index.ts"></script>
index.ts
import * as d3 from 'd3';
import * as topojson from "topojson-client";
import { Vue, Component } from "vue-property-decorator";

@Component
export default class DefaultComponent extends Vue {
    private width: number = 900;
    private height: number = 450;
    private viewBox: string = "0, 0, 900, 450";

    private mounted() {
        // projectionを定義
        let projection = d3.geoEquirectangular()    // 正距円筒図法(Equirectangular)
            .translate([this.width / 2, this.height / 2])     // svgの中心
            .scale(150);

        let path = d3.geoPath(projection);

        // svgに描画
        let svg = d3.select("#svg");
        d3.json("assets/map.json").then(function (json) {
            var countries = (topojson.feature(json, json.objects.countries) as any);
            var view = svg.append("g").selectAll("path")
                .data(countries.features)
                .enter()
                .append("path")
                .attr("stroke", "black")
                .attr("stroke-width", 0.5)
                .attr("fill",
                    function (c: any) {
                        if (c.properties.GU_A3 === "JPN") {
                            return "#0277BD";
                        }
                        else {
                            return "#ffffff";
                        }
                    })
                .attr("d", path as any);
        });
    }
}
日本だけ色塗りされた世界地図の出来上がりです。

Vuetifyできちんと作ってみました(2020/03/27)。
地図の色塗り